home
bikes
lights
Tim's MTB Light
 My MTB light was inspired by the work of Tony Fathers (The Fat Hippy), and others on the MTB-OZ email list. The topic of DIY lighting systems is discussed fairly regularly on the list, and the "consensus" setup is pretty similar to what I have done.
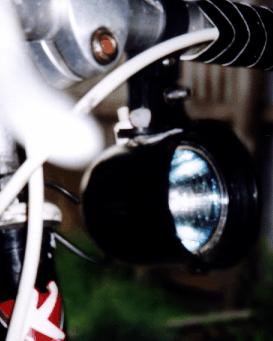
I know that the picture is not of a mountain bike. Big bad bright lights are great on the road too!
The Basics
The fundamentals of my light are a 12 volt, 20 watt halogen dichroic light globe, and a 12 volt, 4 amp-hour sealed lead-acid (SLA) battery (or "gel-cell").
The light globe is the type that is often used in kitchen downlights and shop display cabinet lighting. They are available from a variety of sources, for a range of prices. The cheapest seem to be from Dick Smith Electronics and Jaycar (Australian electronic hobby shops, probably similar to Tandy and Radio Shack in the USA), where they can be had for about A$5 apiece. Some places charge $15+. The Fat Hippy has used and abused lots of different globes, and says that there is a big difference between the light output of good and bad globes - and cost is not always the bottom line. Shop around, and do back-to-back tests if you can.
I use a 51mm diameter glass-faced globe, with a 16 degree beam. Open-faced globes don't offer the filament as much protection from mud, rocks, sticks, and whatever else you ride through. The 16 degree beam gives a small, very bright spot and a less bright "halo" for peripheral vision. I started out with a 35 degree spread which was also good - the spot was duller but wider, making it much better for technical singletrack (rather than having a little bright spot darting from one side of the track to the other). The globes are also available in 60 degree spread, but I don't think these would be particularly useful on a bike. There are also 50W globes, which are extremely bright and use a phenomenal amount of battery power.
There are religious debates over the advantages and problems of different types of batteries. Some use Ni-Cd, Ni-MH or other more exotic rechargables. The SLA has two advantages - they're cheap, and they're pretty rugged. Yes, they're heavy and bulky, so if that worries you, do some reading on batteries and work out whether something else is worth the cost. My 4Ah battery is about 1kg (2#), and cost about $35 at Jaycar. A dedicated charger was another $35 at Jaycar, but only lasted about a year. Dick Smith's chargers are said to be better, and are about the same price. At the moment I'm using a car battery trickle charger.
A 20W light draws about 1.7A at 12V, which should give a life of 2.4 hours from a 4Ah battery. However, batteries don't like putting out big currents, so they need to be derated - I'm lucky to get 2 hours. Others have reported getting about 5 hours out of a 7Ah battery (which has similar dimensions to a house-brick).
The Light Head
A standard halogen dichroic globe is 51mm (2 inches) in diameter. An ex-MTB-OZ listee called Eric noticed that a tow-ball* is the same diameter. The tow-ball cover MTB light was born. Others have used PVC or aluminium pipes.
(* Apparently the term "tow-ball" is confusing to Americans, who might call them something like "trailer-hitch couplings")
My tow-ball cover (TBC) cost $3 at AutoBarn (a chain of car accessory shops). It is black plastic. There have been a few reports of light chromed plastic ones melting and breaking down under the heat, particularly when mated with 50W globes. They should be tested before they are relied on. They aren't expensive, but we'd all rather not build the same light twice for no reason.
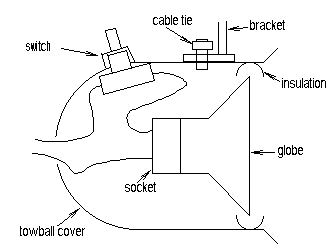
A push-button switch was the cheapest Dick Smith had, and cost something of the order of $1.50. I melted a hole in the TBC with my soldering iron, pushed the barrel through, and screwed the cap on. The globe plugs in to a purpose-made ceramic socket, which was $2 at Jaycar. The wires come out another hole melted in the back of the TBC.
The TBC is slightly larger than the diameter of the globe, and a loose fit is a bad thing on an MTB (note : I'm on to my second globe). Rather than glueing the globe in place, I tried lining it with plastic insulation tubing and wedging it in place. This didn't work very well, as I found out on my inaugural night ride in the Dandenongs. I now have a small self-tapping screw which stops the globe from falling out the front. It's an inelegant solution, but it works. The screw can be made out in the photo at the top of the page, if you look closely.
 Bike shops usually have reflector mounting brackets kicking around, which can be had for a nominal price. I don't think I paid anything for the one I used to mount my light - kindly supplied by my LBS, Lygon Cycles in Brunswick (Melbourne, Australia). The end of the bracket is flat, with two holes approximately 20mm apart. I melted two holes 20mm apart in the TBC, and secured it to the bracket with a zip-tie. It was a bit wobbly, so I wedged an elastic band into the gap. The other end of the bracket screws on to the underside of my handlebar. The light is slightly obscured by gear and brake cables, but it is relatively safe from damage.
Cabling and Battery
I used 2-core speaker cable between the light and the battery. A metre cost 50c at Dick Smith, and it's tidier than having separate positive and negative cables.
The cable breaks near the battery with a pair of RCA plugs. These are also known as video sockets, because they are typically found on the back of your video. I also put an RCA plug on the end of my charger lead, so I could plug the battery straight in to be charged. Together they cost me about $2. It is probably a good idea to use an in-line fuse, as some have done, especially in wet conditions. I didn't bother.
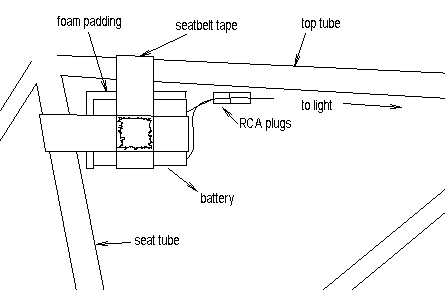 Battery mounting is still an imperfect art. My system works well, but could be better. It consists of one seatbelt-tape strap around the battery and top-tube of the bike, and another around the battery and seat tube. The two tapes are sewn together where they cross. Naturally, this would only work with a traditional diamond-framed bike. My cables are routed along the top of my top-tube, but the battery sling is far enough back that it only touches the braze-ons and cable outers.
In its original incarnation, the tapes both fastened with Velcro tape, which I painstakingly sewed on to the sling. When the velcro was still new, I found that it didn't support the battery well enough when jumping, riding down steps etc., so I replaced the velcro on the support tape (i.e. over the top-tube) with a big snap-buckle, as is found on backpacks. The buckle is simply sewn on, so it is not adjustable and doesn't loosen. It fastens underneath the battery, and is very tight. The tape around the seat-tube still does up with velcro. I taped some closed-cell foam to two sides of the battery, to protect it and my frame.
I use scraps of velcro to secure the light cable to the top-tube. The tape and velcro cost about $3, and the snap-buckle $4, all at a disposal store.
Depending on your frame's (and your!) geometry, it can be a little awkward riding with a little brick between your knees. Some listees ride with their batteries in their hydration packs, and rely on the cable connectors to disconnect in case of a big stack. Others have developed helmet-mounted TBC lights, which avoids the problem altogether. Some have followed the Fat Hippy's lead and developed bottle-cage mounts, although there have been stories of these breaking and pulling the braze-ons out of the frame - bottle cages weren't made to carry heavy batteries.
I was contacted by Peter Signorini (petesig@alphalink.com.au) who had come up with an easy battery mount when he built his lights:
I used a 12V 4.2Ah battery and the towball cover light housing, but I did
not use a switch as I reckon on just disconnecting the RCA plugs for
on/off. I used two pairs of RCA plugs to separate the light, battery pack
and lead.
For the battery pack I have used an old Cannondale seat wedge pack that I
had floating about for about 9 yrs. It seems secure with a bit of
polystyrene packing to stop the battery from slopping about, and I've
often used it to carry similar weight of tools etc. in the past, but it
has been reinforced with some aluminium strip. Similar seat packs are
available, and could easily be rigged up rather than carrying a brick
between your knees.
Total Cost
| Globe | $5 |
| Battery | $35 |
| Charger | $35 |
| Towball cover | $3 |
| Light socket | $2 |
| Switch | $1.50 |
| Speaker cable | $0.50 |
| Tape and velcro | $3 |
| Snap buckle | $4 |
| RCA plugs | $2 |
| TOTAL: | $91 |
That might sound like lots of money if you are American. Be aware that US$1 is worth about A$2 at the moment, and a ~15W brand-name light kit won't give you much change for A$300 in the shops

Issues
The problem with having a non-adjustable snap buckle on the battery sling is that it is ...not adjustable. I sized it for my mountain bike, which has fat aluminium tubes. This makes it rather sloppy on my road bike or tandem, which have (smaller) steel tubes. The best work-around I have come up with to date is to pad the tube out with an old MTB handlebar grip, sliced up one side. Much easier than sewing up a different sling for each bike.
I kept my battery almost permanently connected to the charger for several months. The charger was supposed to revert to trickle-charging once the battery was close to fully charged, maintaining the battery in a charged condition without killing it. The battery is now only good for 10 minutes before it goes dim. Make sure your smart charger really is smart before you leave your battery plugged in.
The charger then charged my replacement battery properly a few times, but now only puts out 4V, which isn't much use. Don't use Jaycar chargers.
I would like to rig up a low-beam light to save on battery power. 20W is great while it lasts, but sometimes a little 5W light that lasts 4-5 times as long would be handy. Using 12V is good, because it means you can use cheap mass-produced car accessories. I haven't found a low-beam light yet that would be easy to mount on a bike, but I'm keeping my eye out. I'm also toying with the idea of using a 12V 2Hz strobe, which are made for car alarms and sell for as little as $10.
Another option for low-beam is a digital controller. I'm going to be playing around with one pretty soon, so stay tuned for more information...
On the car accessory theme, you aren't just limited to lights. I wired a car horn to my battery for a bit of a laugh on critical mass once. It was operated by a little push-switch, which I taped on to the side of my brake lever. Loud! Beeping back at cars...what a great idea! This also has potential for dealing with troublesome dogs. A bit heavy though. I haven't tried a car stereo yet, but I'm sure somebody has...or will...
Back to the bike page
 http://www.timpaton.net
webmaster@timpaton.net
Last updated October 14 2001